Connection types overview
There are three main connection types available to choose from when pairing new devices. The first and most generic is a Network connection that allows you to connect over Wi-Fi or any other network related connection (e.g. USB tethering or wired LAN).
Bluetooth connection is a secure point-to-point wireless connection that is very convenient to use, but requires both sides to have compatible Bluetooth devices available.
USB (adb) connection is an USB connection utilizing Android Debug Bridge (adb), a software-interface for the Android system that allows a computer to connect to an Android device over the USB cable.
You can use navigation below to jump to specific connection type chapter:
USB (adb) connection or bluetooth connection is recommended to use. Both connection types are very secure, fast and very convenient to use. The USB (adb) connection requires to be properly configured on an Android device, but it's advantage is that the remote device is USB powered while connected.
Here you can see the DesktopSMS Client connection type wizard page asking to choose preferred connection type.

Network connection
Network connection is a very generic connection type and can be used in different scenarios. The most common usage is to connect remote devices over Wi-Fi. This network connection can also be used to connect over USB tethering or even over wired network using USB-C Ethernet adapter (if supported by Android device).
Wi-Fi connection
The initial idea for network connection was to use Wi-Fi on Android devices to get connected to clients that are in the same network. Such a scenario is very easy to set up and Wi-Fi is supported and available on the vast majority of Android devices on the market.
But, in some cases, Wi-Fi networks can be isolated from other networks, and sometimes devices connected to the same access point (router) or network are isolated from each other devices as well, all for security reasons. If this is the case, using Wi-Fi as a connection method won't work because there is no network connection between the client and the remote device. For example, guest Wi-Fi networks are usually isolated from other internal networks and allow only internet access. Devices connected to the same guest networks are also isolated from other devices on the same guest network. The same usually applies for well secured corporate Wi-Fi networks. On the other hand, home networks usually work very well with Wi-Fi connection, including device discovery.
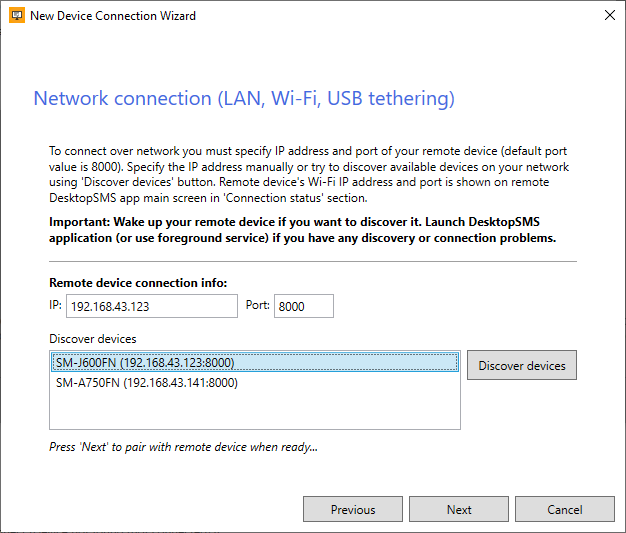
On the screen above you can see the Network connection wizard page that guides you through the process of connecting remote devices using the network. In the list, you can see two discovered devices that were detected after pressing the Discover devices button.
Discovering devices
Discovering devices is the easy way to find available remote devices on the network. To discover devices and to pair them later please make sure that:
- DesktopSMS Lite app is installed on remote device.
- Device's screen is turned on and is unlocked.
- DesktopSMS Lite app is running on foreground (you can see app on screen).
- DesktopSMS Lite app is available for pairing.
IP address, port
An IP address is an address of any device on the network and is unique for each device on the same network. The port number is a kind of a number of a service running on the device. In most cases, IP addresses are assigned to devices dynamically by the DHCP server but can be also configured manually (static addresses). The default port number for DesktopSMS and is 8000, you don't have to change it.
When the IP addresses are assigned dynamically on the network it is required that your Android device always receives the same IP address. This can be configured on the DHCP server. If your device receives a different IP address it won't be possible to connect to such a device until the IP address is changed in the Device properties dialog in the Devices Manager.
Troubleshooting network (Wi-Fi) connection problems
Although Wi-Fi is a very common and widely supported connection type still there might be some issues when using it. Some of the problems we discussed in the previous text, but let's recap all the things to consider when you encounter connection or discovery problems.
- Please make sure Wi-Fi is turned on on your remote device.
- When discovering device, device screen must be turned on and unlocked and the DesktopSMS app must be running on foreground.
- Check whether your computer is on the same network as a remote device. Isn't network communication somehow blocked?
- Check whether the IP address assigned to the remote device does not change.
- Try to wake-up your device (turn screen on) if connection can't be established or is slow.
- Plug the remote device to USB/AC power if connection is not performing well.
USB tethering
USB tethering is an Android feature that allows you to connect a computer to the internet using the mobile phone's internet access. It uses a USB cable to connect the computer to a remote device. A new virtual network is created when both devices are connected and when the USB tethering feature is enabled. The fact that a virtual network is created where both computer and remote device are connected makes it possible to use Network connection type to connect DesktopSMS remote device using USB cable.
To use USB tethering you need to enable it on your Android device. This can be specific to your device (brand and type), but usually you can find it here:
- Settings -> Connection (Wi-Fi, Bluetooth, ...) -> Tethering & Mobile Hotspot -> USB Tethering
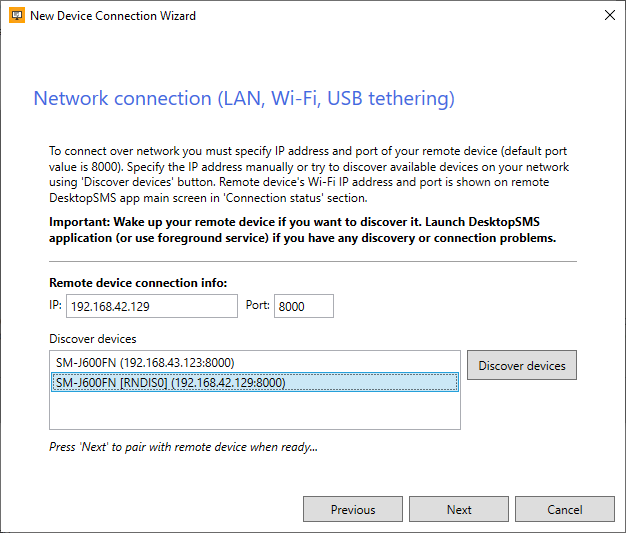
On the screen above the device is discovered with the [RNDIS0] tag appended to the device name (you can read more about RNDIS on Wikipedia). The device can be paired and connected as any other network device.
While the USB tethering may look promising as the way to connect remote DesktopSMS device over a USB connection, there are still some caveats:
- USB tethering cannot be enabled permanently or automatically and needs to be enabled manually every time you want to connect to the remote device.
- USB tethering allows computers to use mobile phone's internet access (but it doesn't mean it will). In case you have a limited mobile data plan this may be a potential problem.
Wired network connection (USB-C Ethernet adapter)
USB-C type port is becoming standard on many Android phones these days and it is possible to use USB-C Ethernet adapters to connect your Android device to a wired local network (LAN). The wired network connection should be more stable than the connection over Wi-Fi.
You can discover, pair and connect such remote DesktopSMS devices using a network connection as well. When a device is discovered on a wired network interface it is displayed with the [ETH0] tag (or with some different number) appended to the device name.
Bluetooth connection
Bluetooth is wireless point-to-point connection between your computer and remote device. It is a secure and convenient connection, but requires both computer and remote device to have compatible bluetooth radio available.
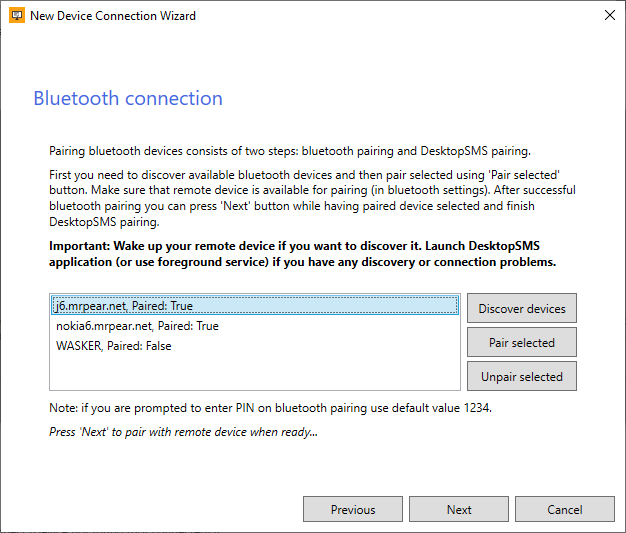
In the screen above you can see a Bluetooth connection wizard page that guides you through the process of bluetooth and DesktopSMS app pairing. The process has two steps, first is bluetooth pairing (pairing on a operating system level, e.g. Windows and Android), followed by DesktopSMS pairing step.
Discovering bluetooth devices
In the example above there are three discovered devices that were discovered after pressing Discover devices button. First two devices are already paired on bluetooth level (Paired: True) and it's not necessary to pair them again. Any paired device can be selected and paired with DesktopSMS remote device by pressing Next button.
To discover new devices that are not paired yet it is required to make remote Android devices visible for other Bluetooth devices, as that is usually disabled by default for security reasons (no one can see your Bluetooth device unless it is paired).
Enabling bluetooth visibility is device specific, but as generic guide you can follow these steps:
- Open settings on your Android device.
- Locate and open Connection settings (Wi-Fi, Bluetooth, Airplane mode, ...).
- Open Bluetooth settings (tap on the Bluetooth text, not switch that just enables/disables bluetooth).
- Turn Bluetooth on (if not already turned on).
- If there is an option to enable device visibility, enable it.
On some devices the bluetooth visibility is enabled while bluetooth settings is active on foreground (so there is no extra control to enable or disable visibility). On some devices, visibility is enabled for a predefined period of time, e.g. one or two minutes. You can discover your device only when the visibility is on, so you need to discover the device immediately.
Note: Already paired devices are discovered automatically without the need to have bluetooth visibility enabled.
Bluetooth pairing
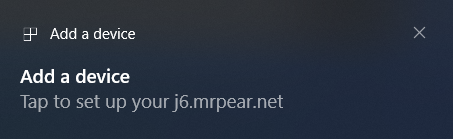
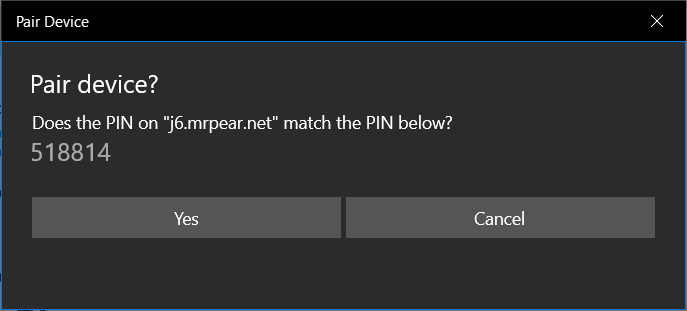
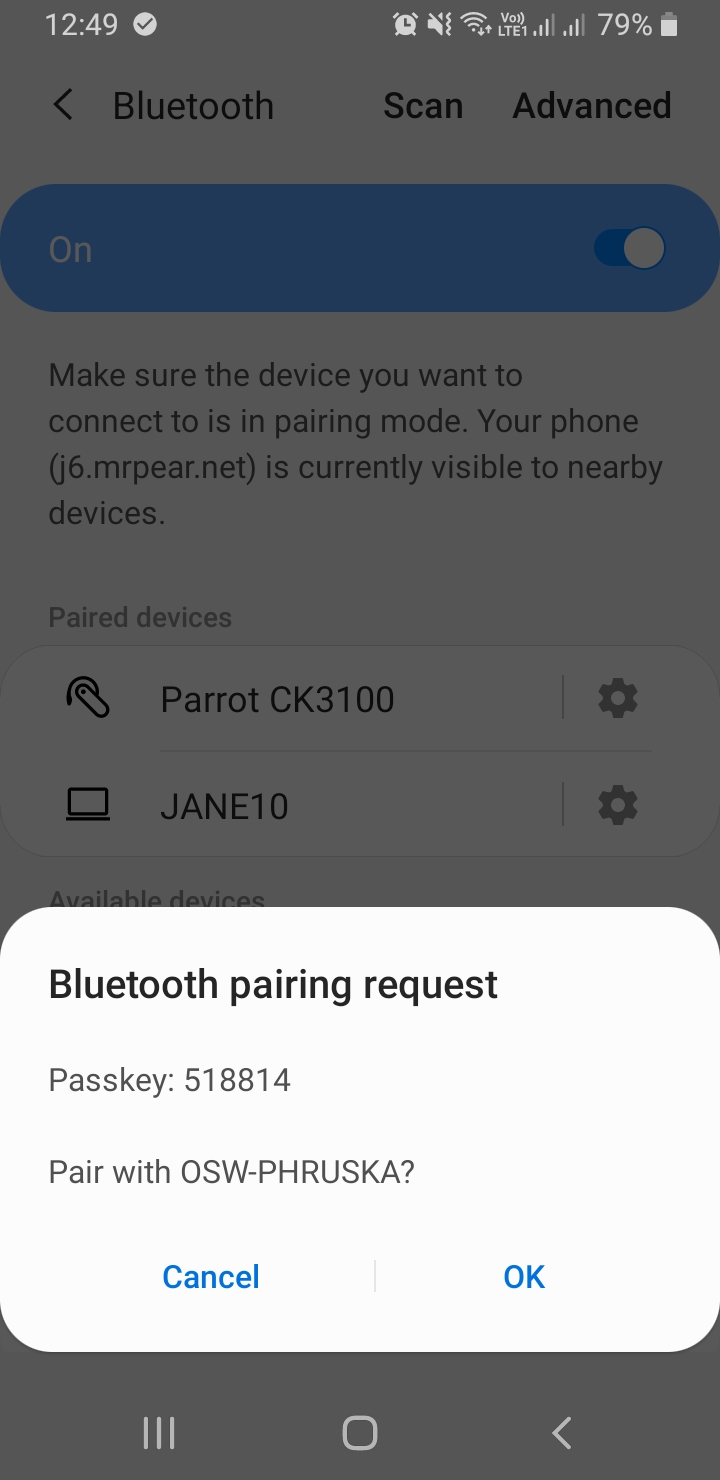
If the devices are not paired on bluetooth level you can use the Pair selected button to initiate bluetooth pairing. You will be prompted with Add a device notification and when the notification is clicked the new dialog is shown to confirm the PIN (automatically generated) on both devices. Pairing must be confirmed both on the computer and also on an Android device as you can see on the last screen. All the examples apply to Windows 10.
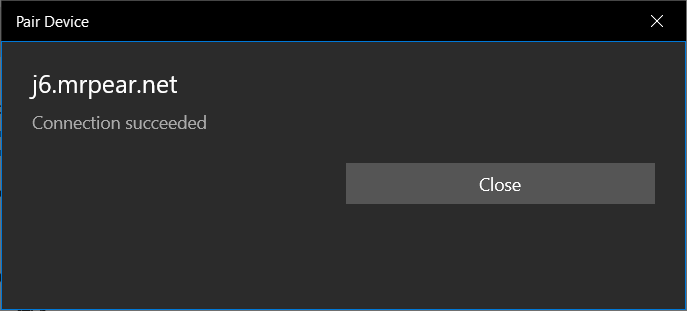
When bluetooth pairing is successful the device can be paired with a remote DesktopSMS app by pressing the Next button.
USB (adb) connection
Android system supports the USB connection between e.g. computer and Android device to transfer files, but still, it does not support connection to transfer generic data on an application level. To solve the problem we can use Android Debug Bridge (adb).
Android Debug Bridge (adb) is a software-interface for the android system that allows the computer to connect to Android devices over USB cable (supports also wireless connection, but this is not interesting for us now). One of the adb features is the ability to transfer data between a computer and Android devices the same way as a network connection works. This makes it a perfect candidate to use as a USB connection method for (not only) DesktopSMS.
Enabling adb on Android device
As the name implies the main purpose of the adb is debugging and is primarily intended to be used by software developers. This is the reason why this feature is disabled on Android devices by default and must be enabled.
To use adb with a device connected over USB, you must enable USB debugging in the device system settings, under Developer options. The problem is that the Developer options screen is hidden by default. To make it visible, go to:
- Settings > About phone.
- Tap Build number seven times.
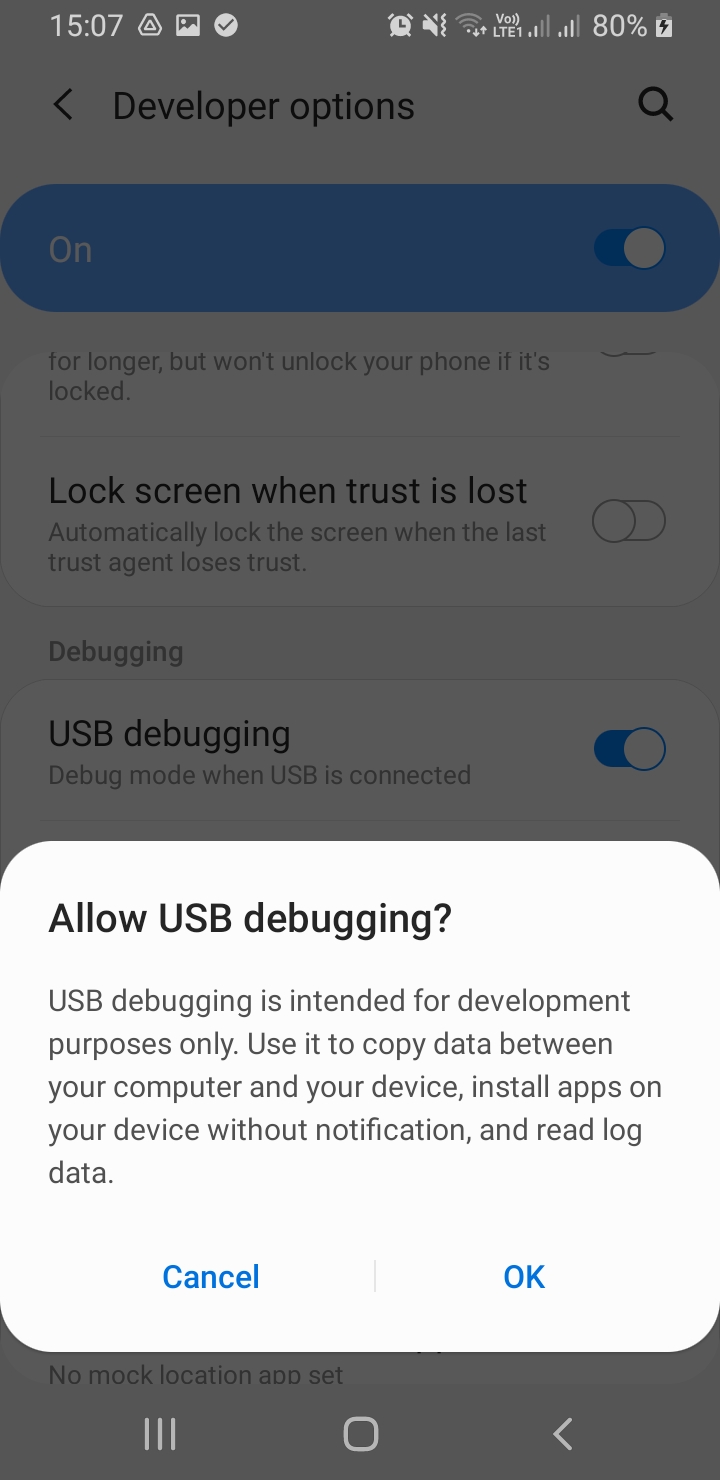
Allow USB debugging for specific computer
The confirmation dialog asking whether to accept an RSA key that allows debugging through the computer is displayed on Android device when USB debugging is enabled and a remote device is connected over USB. This security mechanism protects user devices because it ensures that USB debugging and other adb commands cannot be executed unless you're able to unlock the device and acknowledge the dialog.
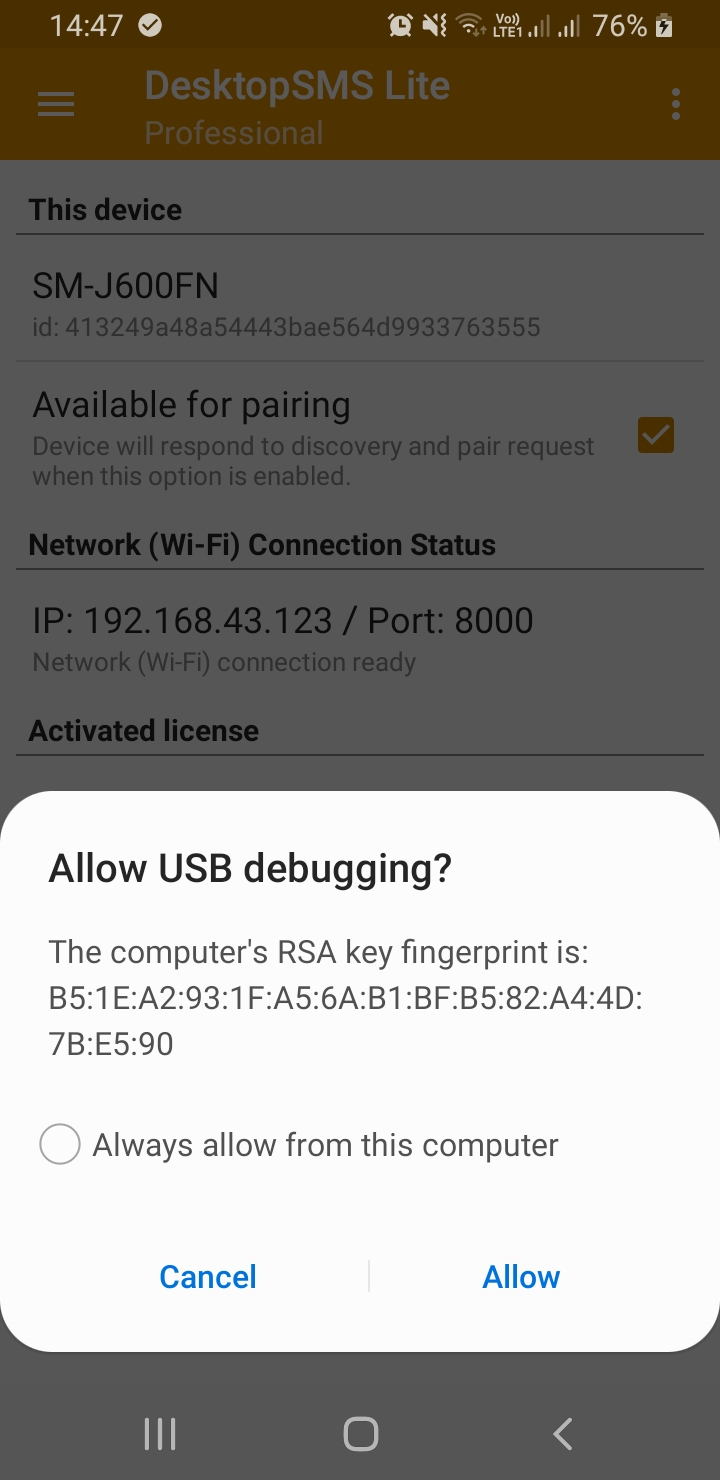
It is recommended to check Always allow from this computer to avoid the need to confirm the debugging every time you connect a remote device to over USB.
Pairing over USB (adb) connection
The device can be discovered when the USB debugging (adb) is enabled and the device is connected.
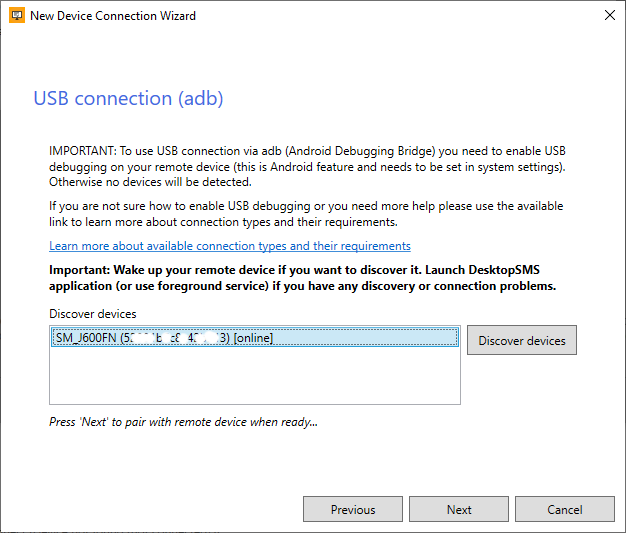
The device is detected as [online] when USB debugging was enabled and also debugging from the connected computer was enabled.
Troubleshooting USB (adb) connection
If you encounter discovery or connection problems while connecting over USB (adb), please check the following steps:
- If the device is discovered as [offline] then the USB debugging from the computer was probably not allowed. Disconnect the USB cable and connect it again, check the remote device to see if there is a USB debugging confirmation dialog and confirm it.
-
If no devices are discovered:
- Check if the device is connected.
- Check if the USB debugging is enabled on a remote device (in Developer settings screen).
- Disconnect the USB cable and connect it back again after a few seconds. Check the remote device to confirm any dialogs.
Final words
We've described all the possible connection types that can be used with DesktopSMS application. If you have any idea to share with us or if you have any problems pairing or connecting remote devices, please let us know, maybe we can learn something together.